RPKI Management at IPXO (IP Holder)
Step-by-step instructions on how to delegate RPKI Management via the IPXO Portal.
RPKI Management is a service that allows managing RPKI from one place at IPXO instead of having to do it via individual Regional Internet Registries (RIRs). Currently, IPXO’s RPKI Management is available for APNIC, ARIN and RIPE NCC subnet holders.
How does RPKI Management work?
If you, as an IP holder, enable IPXO to manage (create/remove) RPKI on your behalf, this will allow IP lessees to start using subnets almost immediately. Moreover, this can help you avoid payout deductions related to failure to create RPKI within 48 hours upon request.
Once you select Delegate to IPXO in the IPXO Portal’s RPKI Management menu, our Product Support team sends an email to a registered account email address with questions regarding the setup type: Fully Delegate or Sub-Delegate. Once the answers are submitted, you receive an .XML file that must be presented to the RIR.
Note: This process requires swiftness because once the process begins on the RIR’s side, it must be completed ASAP (within a day).
RPKI Management benefits
- No more email requests from support to create RPKI
- Additional fully automated status for subnets
- RPKI delegation allows setting up a higher subnet price
- RPKI delegation makes subnets more attractive for lease
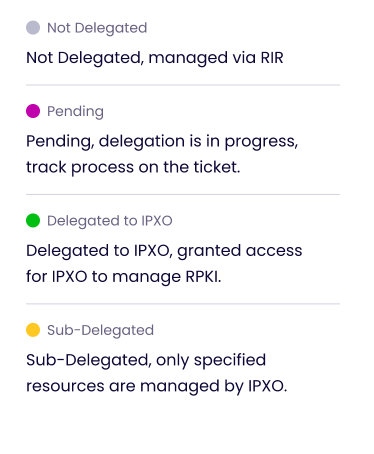
Delegation types
There are two delegation types: Fully Delegate or Sub-Delegate.
If you choose to Fully Delegate RPKI Management to IPXO, you will grant IPXO the access to manage all organization’s RPKIs on your behalf. That includes those that are not added to the IPXO Marketplace. Note that you can remove this access at any time.
If you choose to Sub-Delegate RPKI Management to IPXO, you will grant access to specified subnets only. This type of setup requires your own infrastructure (for example, KRILL), and you must set it up yourself.
How to delegate RPKI Management
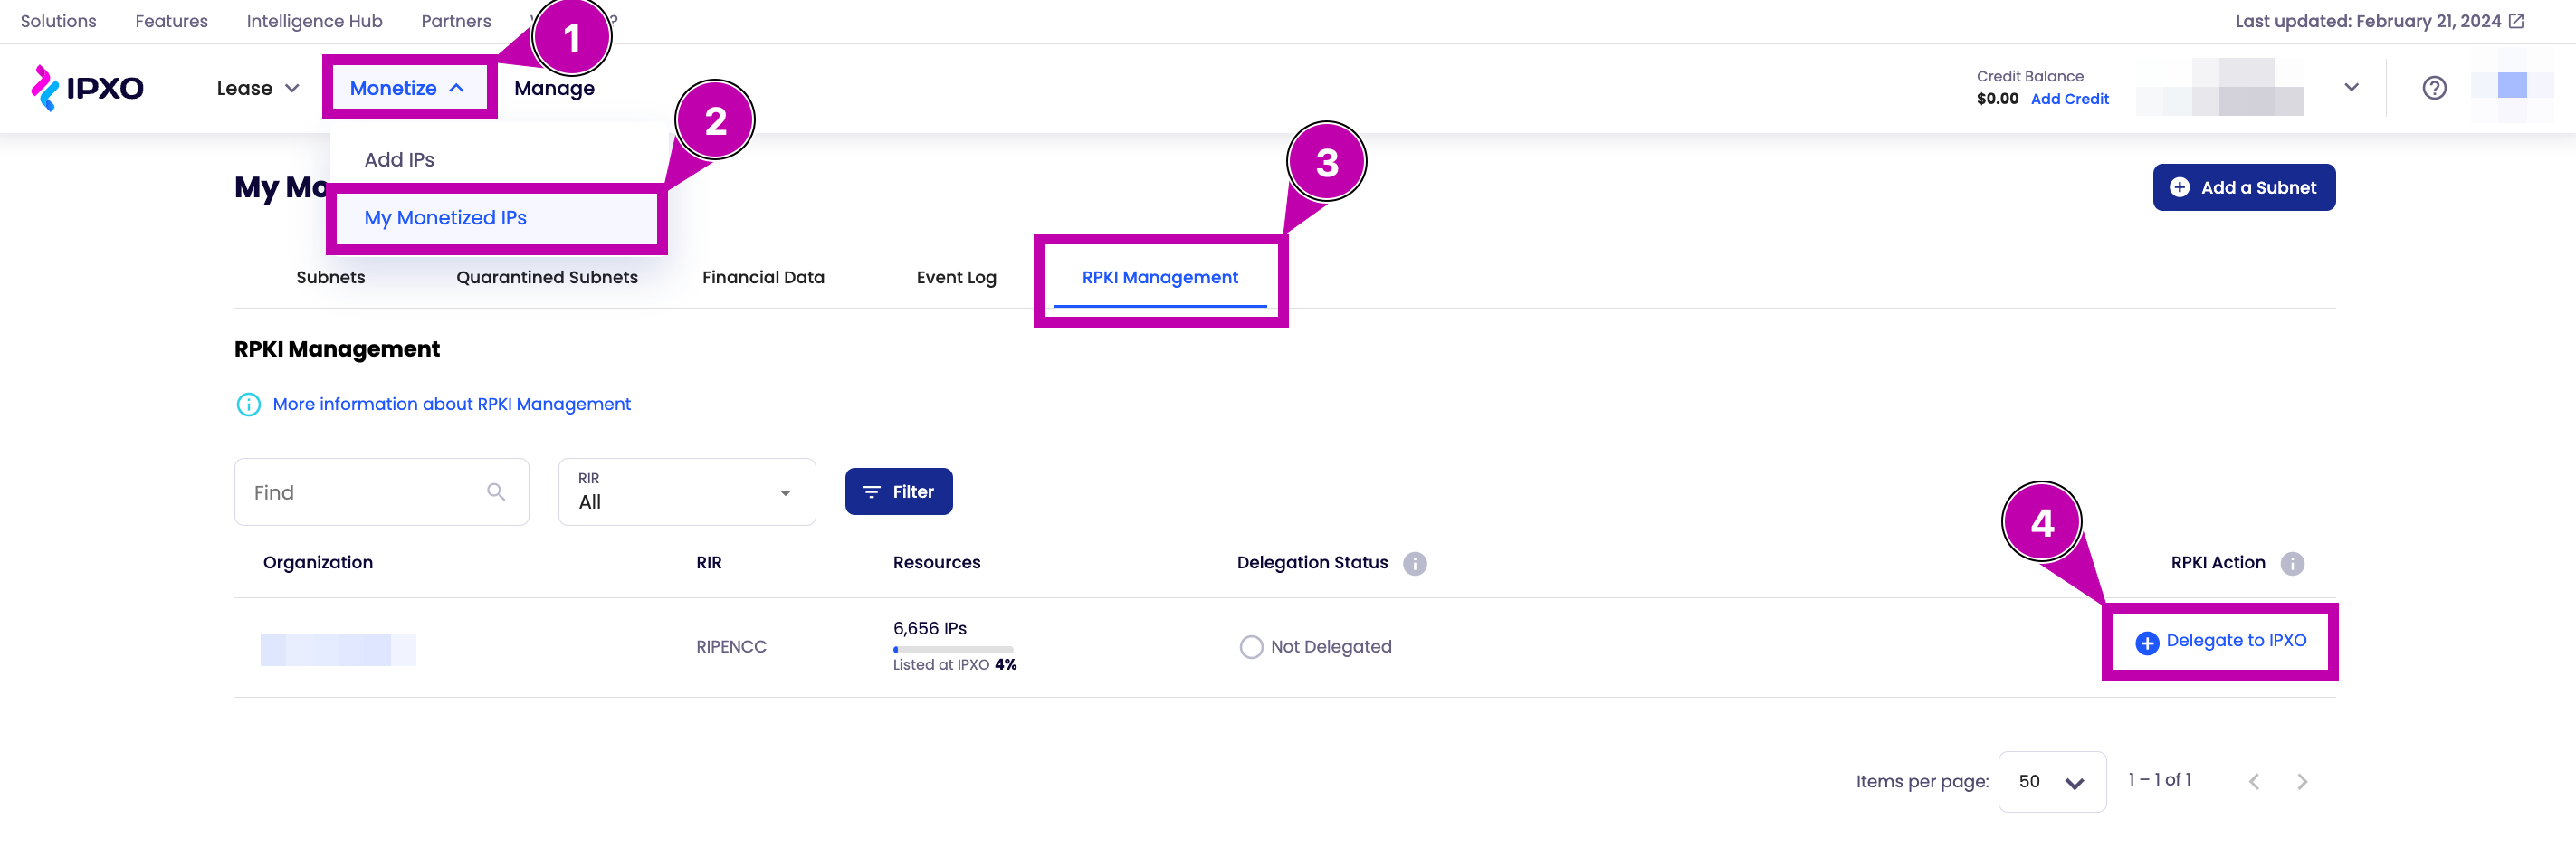
Log in to the IPXO Portal, go to Monetize -> My Monetized IPs -> RPKI Management, identify the organization whose management you want to delegate and then click Delegate to IPXO. Note that RPKI delegation cannot be transferred just by clicking Delegate to IPXO. You will have to dedicate up to 30 minutes for the delegation process.
RIPE NCC
Note: Our Product Support team will contact you via email before you can proceed with RPKI delegation. You will also need to perform the following steps.
- Log in to your RIPE NCC Access account.
- Access the RPKI menu.
- If Hosted RPKI is enabled, revoke it.
- Select Delegated RPKI.
- Attach/provide the XML file (CA ChildXML) sent to you via email.
- Carefully proceed with the requirements.
- If you take all the necessary steps, you will receive a new XML file from RIPE.
- Send us the file by responding to the email we sent you.
ARIN
Note: Our Product Support team will contact you via email before you can proceed with RPKI delegation. You will also need to perform the following steps.
- Log in to your ARIN Account Manager.
- Select Your Records -> Organization Identifiers from the navigation menu.
- Choose the organization for which you want to configure RPKI.
- Choose Actions and select Manage RPKI (if already set as Hosted RPKI, you will need to revoke RPKI first).
- Choose Configure Delegated.
- Read and agree to the RPKI Terms of Service (not required for resources covered by an RSA version 12 or greater).
- In the Request Enrollment in Delegated RPKI menu, provide the Child Request XML (CA ChildXML) sent via email and choose Submit.
- Download the Parent Response XML file (once you provide the Child Request, a ticketed request is generated, and once ARIN staff approves it, the ticket is updated to include the Parent Response XML file as an attachment).
- From RPKI tab view, select Publication Repository.
- Upload/paste the provided RepoXML file sent to you via email.
- If you take all the necessary steps, you will receive a new XML file from ARIN.
- Download and send both response files by responding to the email we sent you.
How to add IST36-ARIN
If you have ARIN resources, there’s a simplified way to delegate RPKI management. Add IST36-ARIN to your Organization Routing POC to allow IPXO to make changes without your input.
- Log in to your ARIN Account Manager.
- Select Your Records -> Organization Identifiers.
- Select your ORG HANDLE.
- Find Organization Points of Contact.
- Select Manage.
- Find Routing POC.
- Add IPXO POC (IST36-ARIN).
- Finally, hit Save.
Contact Customer Solutions
If you have any questions, contact our Customer Solutions Team